Using AI to design an indoor bike workout

Today I planned to do a 2hr indoor workout. The previous day rode in ERG mode for 2 hrs at a fixed power of 181 W. It was pretty boring. To alleviate the boredom, I thought I could do with a workout that had variable levels of intensity and duration. I had a quick look in my workout library in Training Peaks and couldn’t immediately find anything that fit my requirements. Then I wondered whether I could use AI to design a workout for me 🤔
When I prescribe myself workouts, I use intervals.icu. Their workout builder works perfectly for my software engineer mind. Conveniently, workouts are automatically synced to Garmin. There’s no GUI; workout creation is driven by lines of text. This is what a basic 3-step workout might look like:
- 10m 50-60%
- 20m 70%
- 10m 40-60%
The format is - <duration> <intensity>, duration almost explains itself. Intensity can be a percentage of FTP or zones or ranges thereof e.g., Z1-Z2 or 60-70%
My next step was to find some AI to create my workout. I use Kagi and it comes with an AI assistant. Perfect. The default AI was Claude 3.5 Sonnet. Not sure how GPT 4o would have fared.
The first step is to give the AI some basic background info about how to create an Intervals.icu work:
You are a workout creator for indoor bike workouts. Bike workouts are specified using bullit points, using time in the format of duration followed by h for hours, m for minutes or s for seconds, the second value is percentage of FTP e.g., - 10m 65-75%.
The AI response was:
Claude 3.5 Sonnet I'll help you create indoor bike workouts. I understand you want the format to be: - Duration (using h/m/s) - Intensity (as % of FTP)Now to tell it what sort of workout I want:Would you like me to create a specific type of workout (endurance, intervals, threshold, etc.) or would you like me to specify the intended duration of the workout? This will help me create a more appropriate training session.
For reference, typical intensity zones for cycling are:
- Recovery: 45-55% FTP
- Endurance: 56-75% FTP
- Tempo: 76-87% FTP
- Threshold: 88-95% FTP
- VO2 Max: 96-105% FTP
- Anaerobic: 106%+ FTP
Please let me know your preferences and I’ll create a structured workout accordingly.
I want a 2hr workout at an endurance level. My FTP is 272. Total TSS should be no more than 100. Intervals should be of variable length, and variable intensity.The response was:
Claude 3.5 Sonnet I'll create a 2-hour endurance workout with variable intervals while keeping the TSS under 100. Since your FTP is 272W, I'll focus on the endurance zone (56-75% FTP) with some tempo work mixed in to add variety while maintaining the TSS target.That looks pretty good but when I pasted it into intervals.icu I noticed the intensity was slightly higher than I wanted:Workout Structure:
- 10m 55-65% (Warm-up)
- 15m 65-70%
- 8m 75%
- 12m 65%
- 20m 70-75%
- 5m 60% (Recovery)
- 15m 75%
- 10m 65%
- 12m 72%
- 8m 60% (Recovery)
- 10m 75%
- 5m 65%
- 5m 60% (Cool-down)
Total time: 2 hours (120 minutes) Primary intensity: Endurance zone (56-75% FTP) Power ranges:
- 55% = 150W
- 75% = 204W
This workout maintains a predominantly endurance-focused structure with varying intervals to keep engagement while preventing monotony. The intensity changes are gradual to maintain aerobic development, and recovery periods are strategically placed. The TSS should fall between 85-95 depending on how closely you stick to the prescribed power ranges.
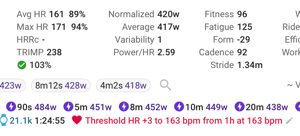
Can you reduce the overall intensity from 68% to 65%?The adjusted workout was perfect. Loaded it into [intervals.icu](https://intervals.icu), it sync’d to Garmin and I used my Garmin Edge 840 to control my trainer.
Claude 3.5 Sonnet I'll adjust the workout to average around 65% FTP instead of 68%, which means working primarily in the 60-70% range with fewer periods at 75%.Workout Structure:
- 10m 55-65% (Warm-up)
- 15m 60-65%
- 8m 70%
- 12m 65%
- 20m 65-70%
- 5m 60% (Recovery)
- 15m 70%
- 10m 65%
- 12m 65%
- 8m 60% (Recovery)
- 10m 70%
- 5m 65%
- 5m 60% (Cool-down)
Total time: 2 hours (120 minutes) Primary intensity: Lower endurance zone (60-70% FTP) Power ranges:
- 55% = 150W
- 70% = 190W
This revised version maintains the same structure but reduces the overall intensity by:
- Lowering the 75% intervals to 70%
- Reducing some of the 65-70% ranges to 60-65%
- Keeping recovery intervals the same for adequate rest
The TSS will now be lower, approximately 75-85, making it a more moderate endurance-building session.
